Resin, rigging, two wings, multi coloured camo, here we go from start to finish!

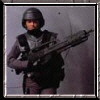
the resin pieces


here's the resin IP, pretty basic with no detail to paint

I used some leftover IP decals from the P61 and....

resin all cut and cleaned, awaiting interior green


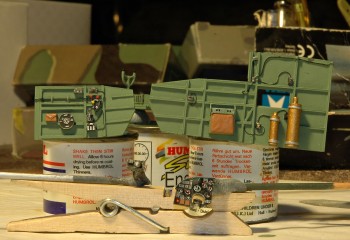
got some very thin spring steel wire for the rigging

48th fig for a better scale

here is the resin engine (just black base coat) drilled out for the brass tube prop shaft, made the retainer donut from a round solid piece of scrap drilled that then drilled a countersunk hole in the back of the engine so the donut spins free. this end glues to the engine nacelle.
Prop was a two piece affair which needed filling with scrap spru then filed flat for drilling to match the brass rod size, should spin nice when together.

I have the wheel wells in place, just need to sand down the outside of them so they are flush with the wing

Eight of the sixteen rigging teardrops in place, I had three on then found they are shaped flatter on one side for the rigging hole that has to be drilled...... fixed that then glued the others right way around.
Been spending lots of time on the joins so we will see how they look with some primer on.
Top wing joins have been strengthened with four evergreen plastic tabs and a centre .60 strip running thru the wing join area.
And a look at the size of the smaller wire against the teardrop, going by photos of the wing rigging which look quite thick - maybe for those jarring water takeoffs! it looks pretty spot on to me so will go with it.
The thicker size is for the engine/nacelle bracing wires to fuse, which are thicker on the real bird.

The pit detail painting,ongoing!


Strengthened the lower wing to fuse join with some evergreen plastic strips Ca glued and drilled to take brass rod inserts

all parts are now cleaned and numbered, although I have one part that doesn't show on the sheet!
It could be for the rudder trim tab that says to cut out from plastic strip using the supplied template.
Slow and steady progress!
both lower wings dry fitted with twin brass rod supports, they work well, this will give so much added support when both wings are fitted.

a dry fit of wings and a test piece of the thin metal rod for the rigging,

and a little cartoon I found for the Walrus!

playing around with washes for the interior green and getting the resin pieces sorted to fit without fouling the fuse joining step!, also added a bit more flooring as it seemed to be lacking in an area.
Interior just about done, will be adding a pilot and a few more extra parts but you can't see much once closed


Take your last look at the interior! closed up now.


this was a tough nut to get right, kit gives you plastic pins on the gear legs, but straight pins, almost like fitting a square peg in a round hole.
I cut these off and inserted the larger spring steel rod into the pieces, they need bending almost 90 deg to work right.
where the red arrow is, needs a pin to strengthen the main gear leg. from what I've found a locking pin deployed on the real aircraft so this helped no end to stabilize this piece

trial and error, I ended up using a scrap piece of resin rod, drilled thru and inserted a piece of spring steel rod.
I think i could drop this baby on it now and it would survive!!!!
You can see the other rod on the supporting arm as well, this one is thin so be careful with the pair, i snapped one.


just finished the pins and test fitting of the elevators and rudder tonight.
Don't forget to stagger the pins on each one so they don't clash.

here's the four wing struts pinned and glued into the top wing only, the front engine struts into the fuselage and applied the 5 degree offset (my best guess!!!) engine position, and aligned the top wing as best I could while the glue set on those tricky wing struts.
Two more inner struts have to be added but I think they won't need pins.
All the main struts have been drilled and pins inserted, I intend to paint the wings/engine separate with the shadow shaded camo then glue the top wing to the lower, engine to the support struts, then the small top of engine assembly struts to top wing.
Adding the pins to the struts helped out well, these held all the pieces in place as I fiddled around with positioning, this was a tricky process!
Hope I make sense as I quite feel like this

at the moment!!!
finished pinning and getting the floats positioned, CA had the hole points wrong as the float supports align with the wing struts,
the spring steel rod works very well, also works well getting the claret flowing when you snag your fingers.......

As you can see the inner struts are far too short as were the tail struts, evergreen strips to the rescue

floats, tail struts just blu tacked on atm, top front engine support struts will need the pin treatment as well.
Two rear supports will have to be made as the kit ones are again short.

a little bit of info on this bird
http://www.ipmsstockholm.org/magazine/1998/01/stuff_eng_detail_walrus.htmFor those that didn't know,
this aircraft could be looped!!!
The prototype was first flown by "Mutt" Summers on 21 June 1933; five days later it made an appearance at the SBAC show at Hendon, where Summers startled the spectators (R. J. Mitchell among them) by looping the aircraft
here's a vid I found - this must be rare to find an actual vid of one.
https://www.youtube.com/watch?v=4-2UAXblTUEfirst off - the photos are weird! can't get the color right for some reason!!! maybe too many Becks..........but at least you can get an idea where I'm at, man this 4 color shadow shaded camo is kicking my butt!!


I have an LED globe I'm going to try for the next lot of pics, the colors used are Humbrol 125 grey and 224 dark slate grey for the two upper colors.
And had a ''Barry''( a Shocker. A bad time.) with the slate, will fix the mistake later.


prop spins nice and clears the top wing!!! :yahoo:


She may not be 100% perfect but I think pretty close - that top wing/strut and engine placement was the things that had me the most worried for this build.
paint finished and decals on


Decals finished tonight, Future decal coat can harden for a day or two then I'll flatcoat it.
have finished all the wire bracing last night, now doing paint touchups, I haven't glued the main wing braces in yet, makes it much easier work on the lower with weathering wise.


Here is the Classic Airframes Supermarine Walrus finished.
Added gun sights, ropes, rear hatch in open position with support, all the lovely detail inside is hidden!! but thoroughly enjoyed this build.
I triple coated it with Testors rattle flatcote, and used Tamiya weathering sets rubbed over the wing ribs and sides, sunlight negates most of it.


I did enjoy this one, I think there may be a stigma about the difficulty in building this kit but lots of thinking and planning gets you there.
Trickiest part I think was getting the engine main struts at that 5 degree off centre and the position for the prop to clear the top wing when it spins.
One Classic Airframes left in the stash -

To be decaled with this set